If you want to enjoy the benefits of decentralized exchanges, chances are you’ll end up using Uniswap, as it’s currently the most popular DEX. However, as a beginner, it might seem quite difficult to understand how to use it.
That’s why, in this article, we’ll discuss all the key aspects of Uniswap and how you can make the most of the platform.
What is Uniswap?
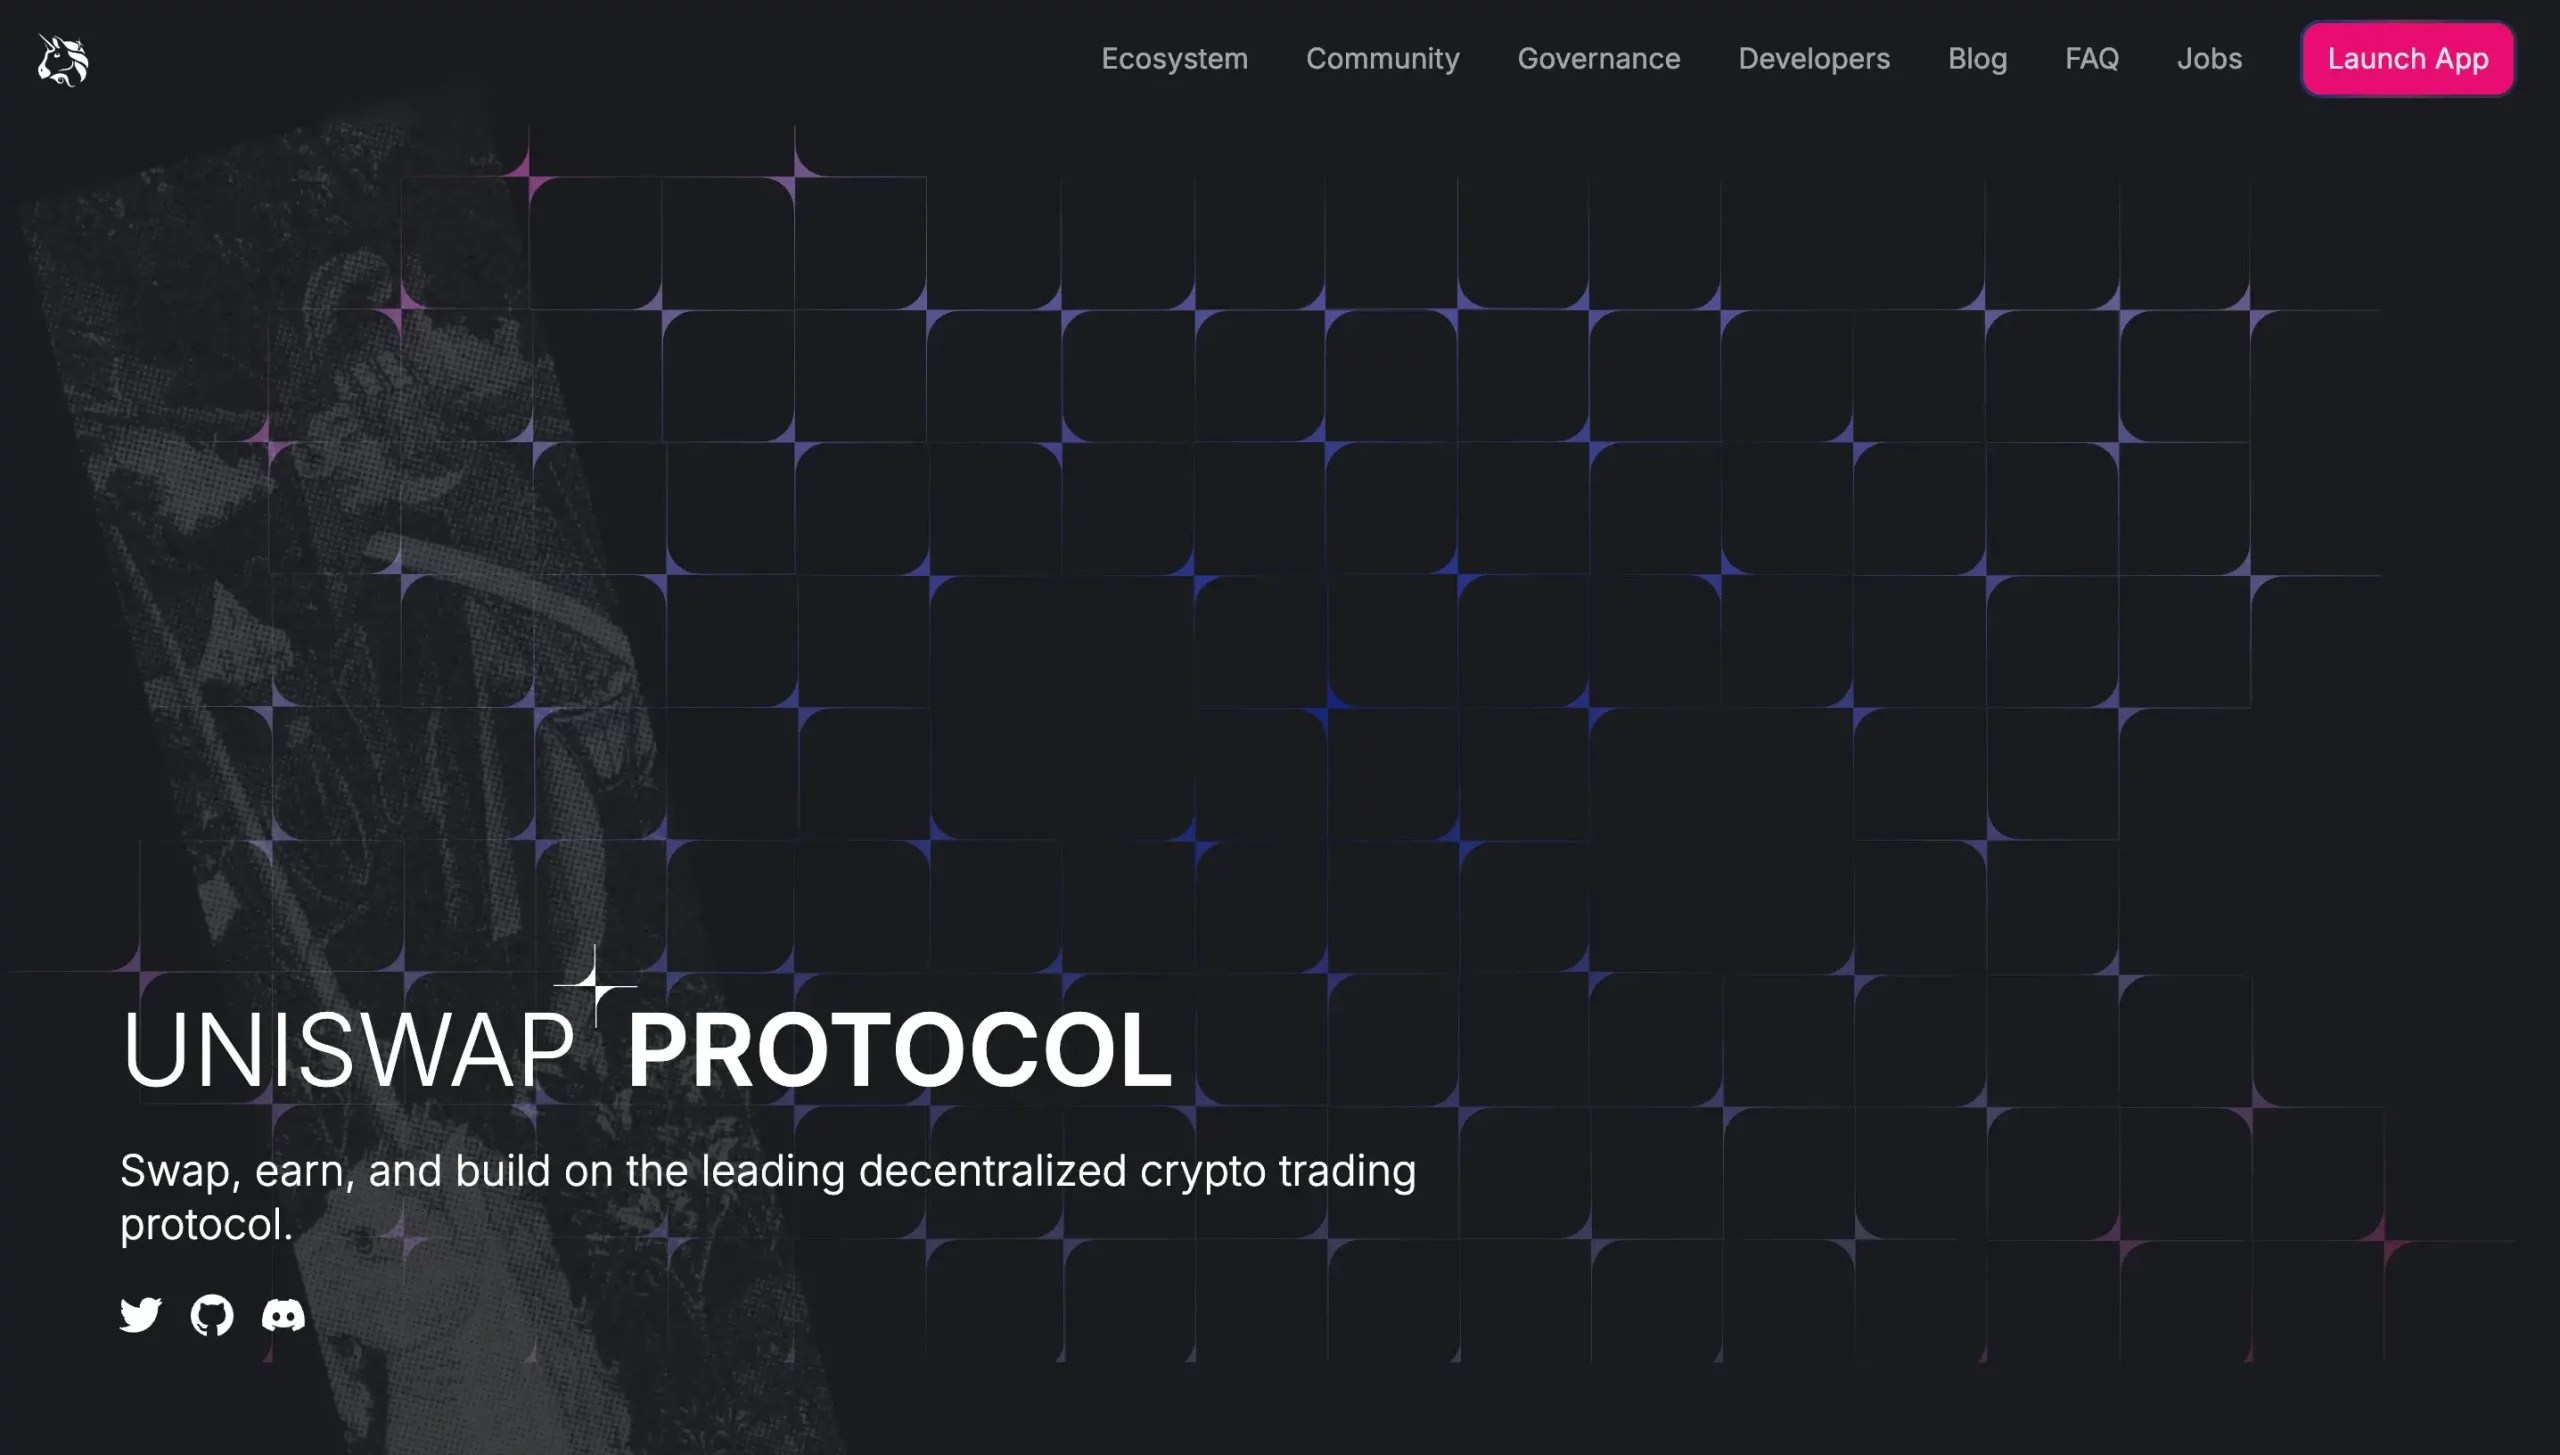
Uniswap was one of the first decentralized finance (DeFi) apps to gain major attention on Ethereum, launching in November 2018. Today, it’s the largest decentralized exchange (DEX) on the Ethereum blockchain.
Unlike traditional exchanges like Binance or Coinbase, Uniswap is fully decentralized, meaning any single company or organization does not control it.
It uses a unique trading model called an automated market maker (AMM), where users provide tokens to liquidity pools that automatically set prices based on supply and demand.
This setup lets users trade cryptocurrencies (buy, swap, send, etc.) directly with one another without needing a middleman like traditional exchanges.
Uniswap also has its own token, called UNI token. As a governance token, UNI gives HODLers the power to vote on important updates and decisions about the platform, like how tokens should be distributed or changes to fees.
The UNI tokens were introduced in September 2020 to prevent users from switching to a competitor, SushiSwap (a fork of Uniswap).
How Does Uniswap Work?
Uniswap operates completely differently from traditional centralized exchanges. It does away with the need for an order book (which is not DEX-friendly due to, among other aspects, liquidity issues). Instead, it uses a model called the Constant Product Market Maker, which is a type of Automated Market Maker (AMM).
AMMs are smart contracts that hold liquidity pools, which traders use to make trades. These pools are funded by liquidity providers—anyone who can deposit an equal value of two tokens into the pool. In return for providing liquidity, traders pay a fee that gets distributed among the liquidity providers based on their contribution to the pool.
To create a trading market, liquidity providers deposit two tokens of equal value into the pool. On Uniswap, these tokens can be ETH and any ERC-20 token or even two different ERC-20 tokens.
Many pools use stablecoins like DAI, but it’s not a requirement. In exchange for liquidity, these providers earn “liquidity tokens,” representing their share of the pool.
Let’s look at an example of an ETH/DAI liquidity pool to explain how it works. If “x” represents the ETH in the pool and “y” represents the DAI, Uniswap multiplies these two amounts to calculate the total liquidity, represented by “k.” The core idea is that “k” (total liquidity) remains constant, no matter the trades happening in the pool.
So, the formula looks like this: x * y = k.
Now, if someone wants to trade, like Patrick, who buys 1 ETH for 2300 DAI, he adds more DAI to the pool and reduces the amount of ETH. Because there’s now less ETH in the pool, its price goes up. This balancing act of supply and demand, where “k” must stay constant, is what determines the price of tokens in Uniswap’s pools.
How to Use Uniswap Protocol – Everything You Must Know
Now that you have a basic understanding of Uniswap and how it works, let’s explore what you need to know as a beginner to start using it for different activities.
First, we’ll walk you through the essential step of connecting your wallet to the Uniswap app—this is key because every action you’ll take, from swapping tokens to trading NFTs, depends on having your wallet linked.
Once you’re set, we’ll guide you through how to swap, send, and buy tokens, as well as how to trade NFTs, making it easy for you to navigate all the features Uniswap has to offer.
How to Connect Your Crypto Wallet to Uniswap: Step-by-Step Guide
Right now, you can connect a crypto wallet to the Uniswap Protocol using one of these options: the official Uniswap Wallet (available for iOS, Android, and Chrome), MetaMask, Brave Wallet, WalletConnect, or Coinbase Wallet.
To make things easier to follow, we’ll walk you through the steps using MetaMask, but the process is pretty much the same for any of the other wallets.
Step 1. Access the Uniswap Official Website to Launch the App and Press the “Connect” Button
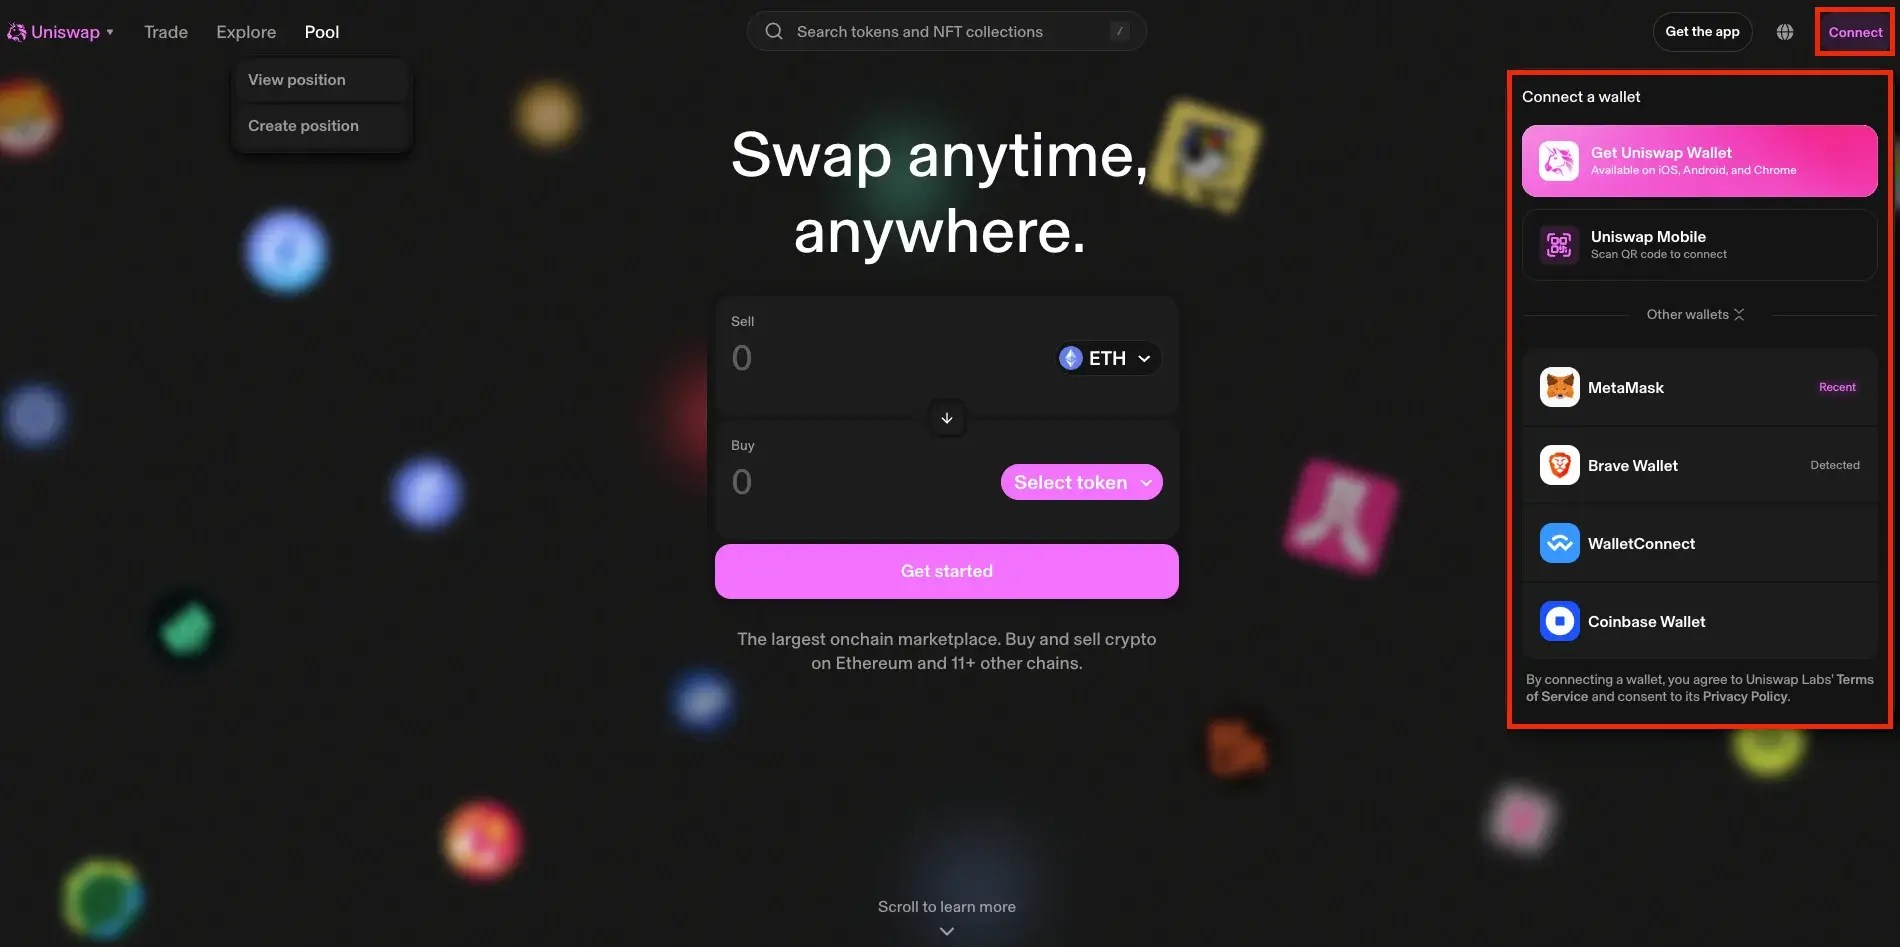
Start by visiting the official Uniswap website. Once you’re there, you’ll see a “Launch App” button in the top right corner. Click it to get started.
After the app opens, look for the “Connect” button in the top right corner. Click it and choose the wallet you’d like to use (we’ll use MetaMask as an example).
Step 2. Link Your MetaMask Wallet
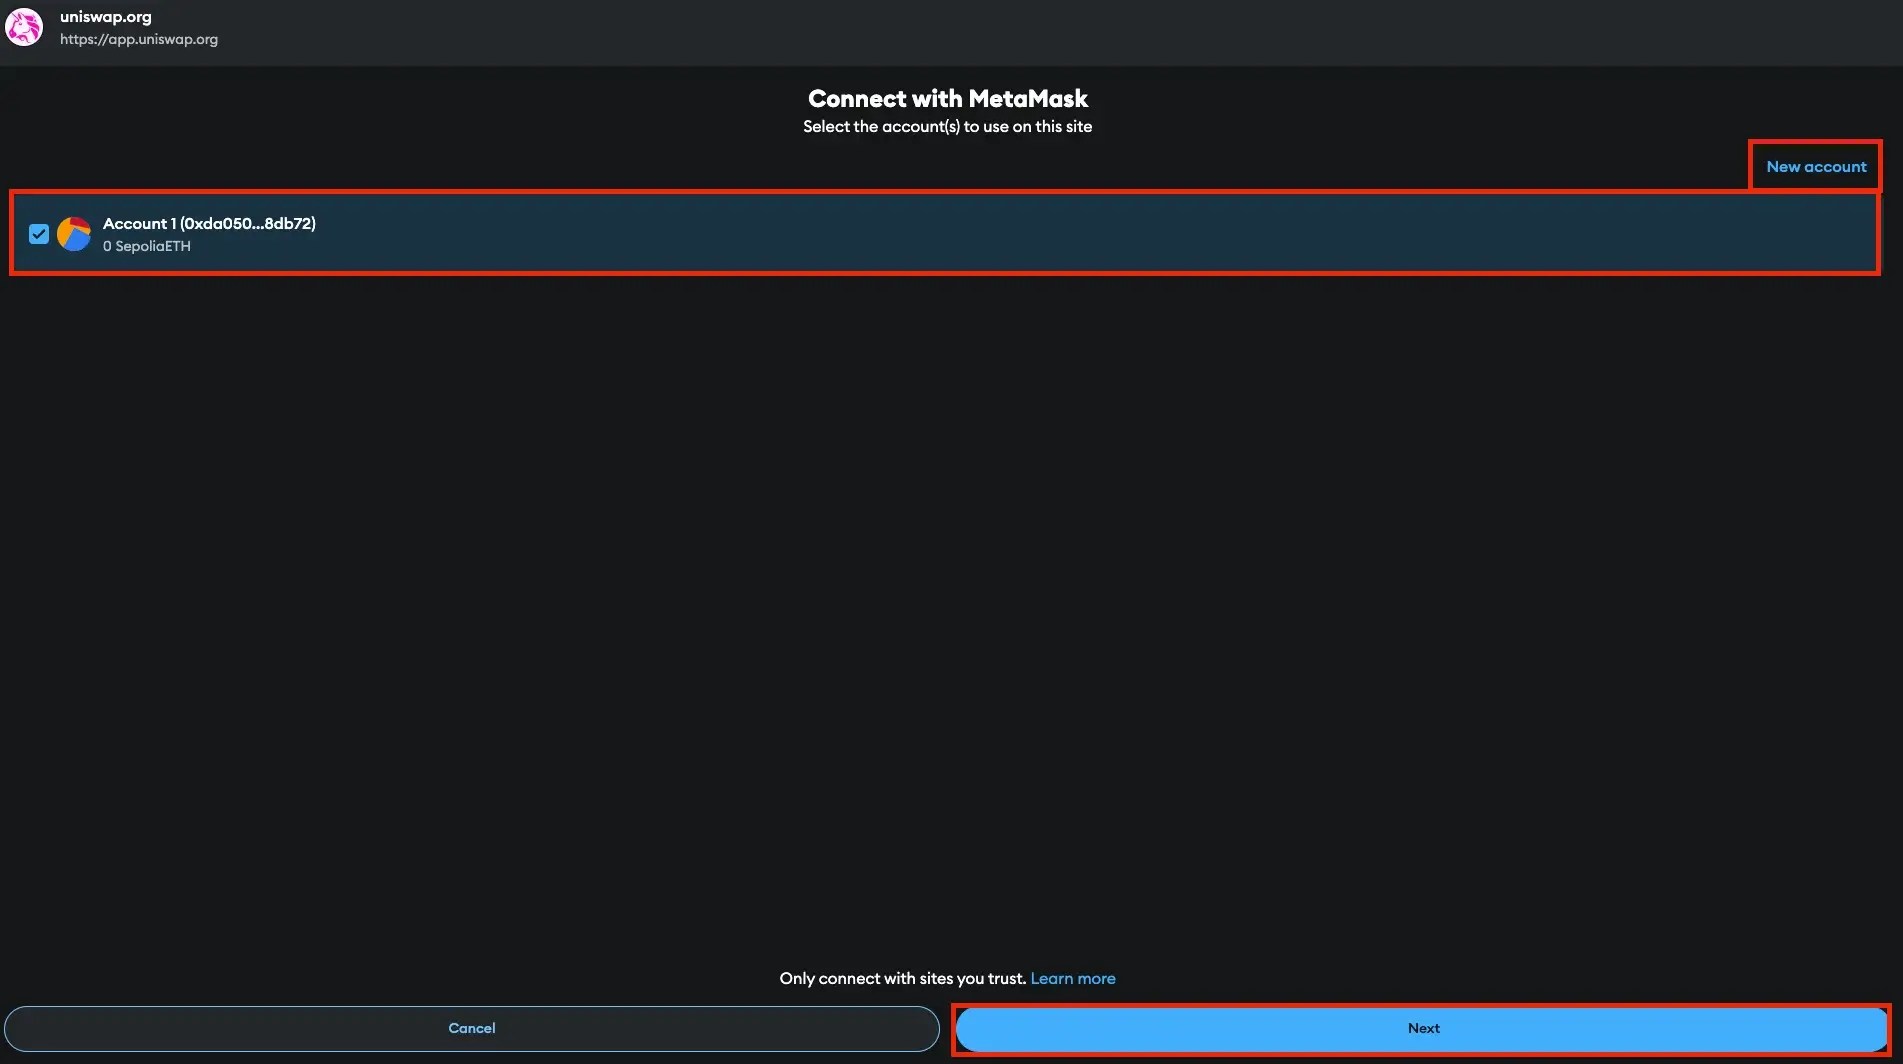
Once you click “Connect,” a new window will pop up. Here, you can select which MetaMask account you want to link to Uniswap. If you don’t have one yet or prefer a new one, simply click “New Account” to create it.
After selecting your account, hit “Next,” then click “Confirm” to grant Uniswap the necessary permissions.
And just like that, your MetaMask wallet is connected to Uniswap!
How to Use Uniswap to Swap Tokens: Step-by-Step Guide
Swapping tokens on Uniswap allows you to exchange one cryptocurrency for another directly on the platform without the need for intermediaries. This decentralized process makes it simple and secure to trade a wide range of tokens.
Below, we’ll walk you through the steps to successfully swap tokens on Uniswap.
Step 1. Go to the “Swap” Section and Enter Your Transaction Details
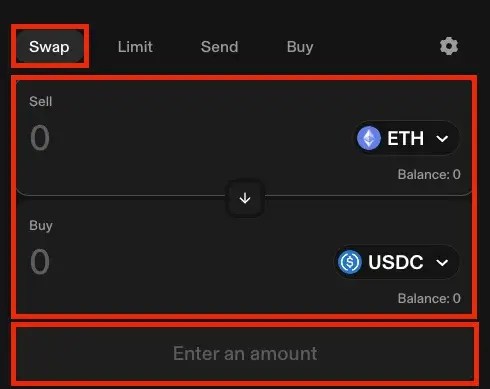
After connecting your wallet to Uniswap, navigate to the main page and click on the “Swap” section to start swapping your crypto.
From the drop-down menu, choose the cryptocurrency you want to sell from your portfolio, enter the amount, and then select the cryptocurrency you want to receive in exchange.
After entering all the details, click “Swap.”
Step 2. Review and Confirm the Swap
Take a moment to review all the transaction details. If everything looks good, click the “Approve and swap” button.
In your wallet, you’ll need to approve the token you’re swapping, which will require a network fee. If it’s your first time swapping that token on Uniswap, you’ll also need to authorize the token for trading.
Once that’s done, sign the message in your wallet (this part doesn’t require any network fee). Finally, confirm the swap in your wallet, which will again require a network fee.
Once confirmed, your swap will be submitted to the blockchain, and you’ll see a “Swap success” message with a green checkmark once the transaction is complete.
How to Use Uniswap to Send Crypto Assets: Step-by-Step Guide
Sending crypto assets on Uniswap is a straightforward way to transfer tokens from one wallet to another. Whether you’re paying someone or transferring assets between your own wallets, Uniswap makes it easy.
Step 1. Go to the “Send” Section and Enter Your Transaction Details
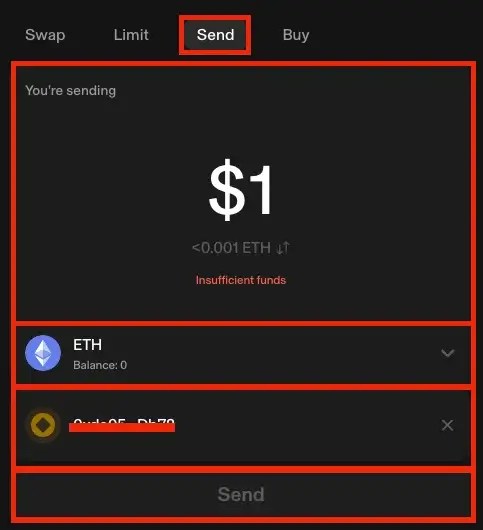
Once your wallet is connected to Uniswap, head to the main page and click on the “Send” section to transfer your crypto.
Enter the amount you want to send, choose the cryptocurrency from the drop-down menu, and in the “To” field, add the wallet address or ENS name of the recipient.
Once all the details are filled in, click the “Send” button.
Step 2. Review and Confirm the Transaction
If this is the first time your wallet is sending tokens to the entered address, a message may pop up. Review it carefully and click “Continue.” After that, confirm the transaction by selecting “Confirm send.”
Once the transaction is submitted, you’ll see a pending icon in the top right corner. A notification will let you know when the transaction is completed. You can click on the notification to view the transaction on the blockchain explorer.
How to Use Uniswap to Buy Crypto: Step-by-Step Guide
Uniswap users can buy a wide range of ERC-20 tokens on the Uniswap platform. Below is how you can do that.
Step 1. Go to the “Buy” Section and Enter the Details About the Transaction
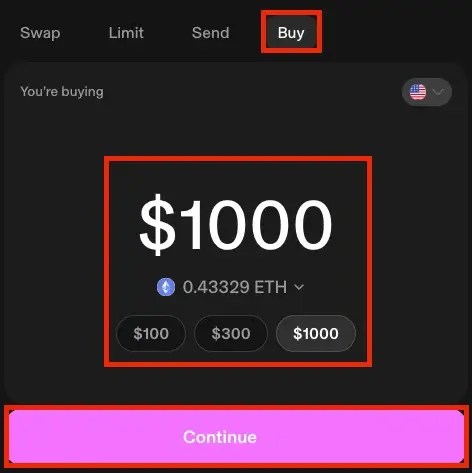
After connecting your wallet to Uniswap, head to the main page and click on the “Buy” section to start purchasing crypto.
Here, you’ll need to select your region, insert the amount you want to buy, and pick the cryptocurrency you want. Once you’ve entered the details, click “Continue.”
Step 2. Choose a Provider and Complete the Transaction
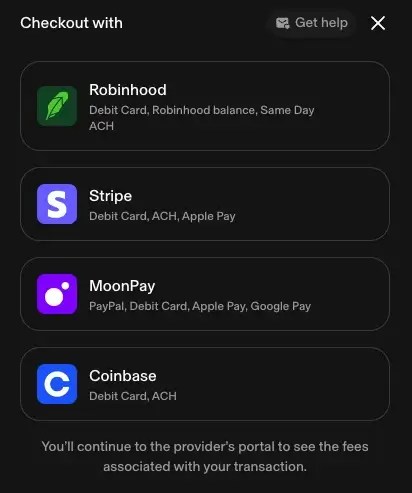
Now, you’ll see a list of providers you can use to buy crypto. The options will depend on your region and could include providers like Robinhood, Coinbase, MoonPay, or Stripe.
Select your preferred provider, and you’ll be redirected to their site to complete the purchase.
If you’re using the provider for the first time, you might need to verify your email, phone number, or even your identity, depending on your location.
Once you’ve completed these steps, your crypto will be deposited directly into your wallet.
How to Use Uniswap for NFT Trading: Step-by-Step Guide
Uniswap provides an easy way to purchase NFTs directly through their platform. We’ll walk you through the steps below.
Additionally, you can also buy from popular NFT marketplaces like OpenSea via Uniswap using a similar process.
Step 1. Go to the NFT Trading Page on Uniswap
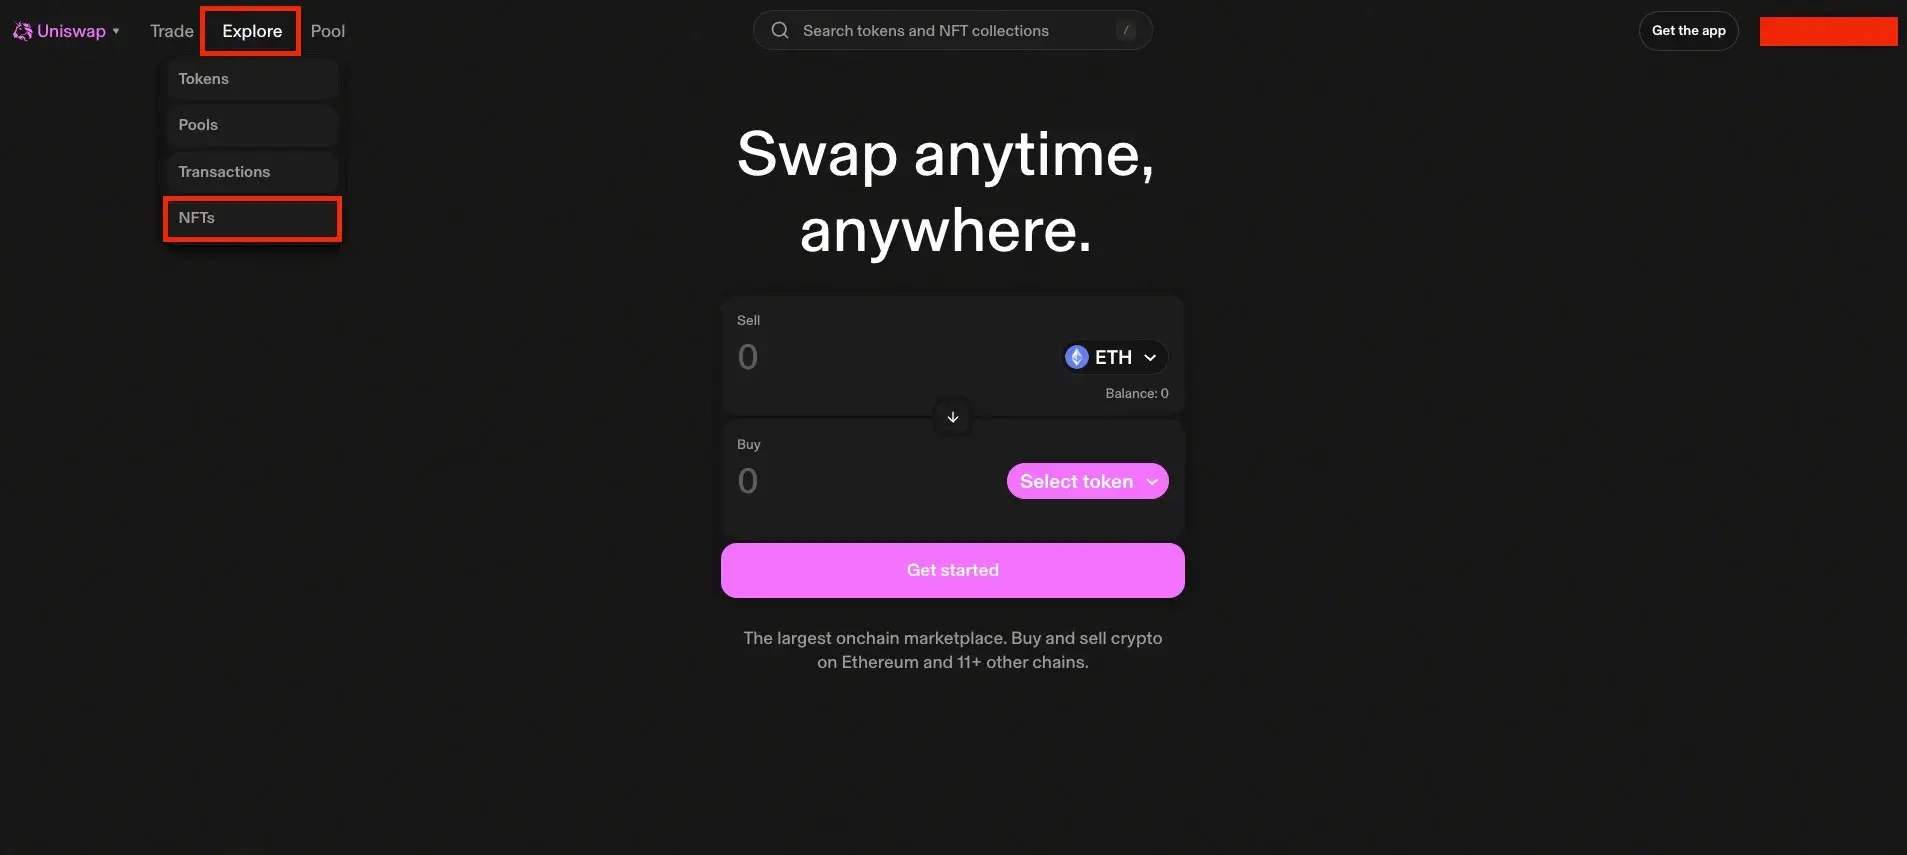
To facilitate trading with NFTs on the Uniswap platform, you’ll need to access the special section designed for this purpose. From the header bar, click on “Explore” and then select “NFTs.” This will take you to Uniswap’s NFT trading page.
Step 2. Search for Your Desired NFT

At the top of the NFT trading page, you’ll see a search bar. Use it to find the specific NFT you want to buy.
You can also explore popular NFT collections displayed just below the search bar.
Step 3. Add the NFT to Your Bag and Complete the Purchase
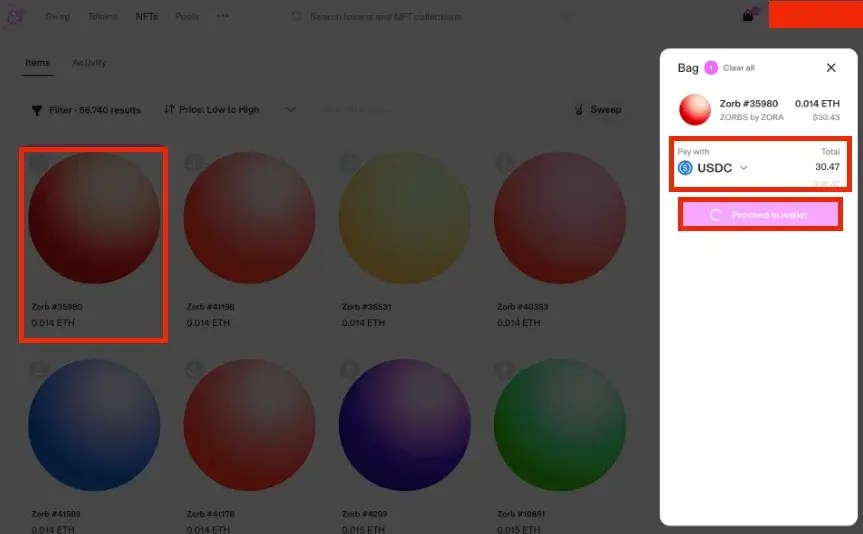
Once you find the NFT you want, hover over it and click the “Add to bag” button.
After adding it to your bag, choose the cryptocurrency you want to use for payment and click “Pay.” Make sure the amount of tokens in your wallet covers the total price of the NFT, and you’re all set!
How to Use Uniswap Protocol as a Liquidity Provider: Step-by-Step Guide
As an automated liquidity protocol, Uniswap also allows you to use its platform to provide liquidity. Below is how.
Step 1. Access the Uniswap App and Select “New Position”

To begin adding liquidity on Uniswap V3, open the Uniswap web app and navigate to the “Pools” section. This is where you can create or manage liquidity pools.
From here, click on the “New Position” option to start. You’ll need to select the tokens for which you want to add liquidity by choosing them from the drop-down menus.
Uniswap allows any pair of ERC-20 tokens, so you have plenty of options.
Step 2. Select Fee Tier and Price Range
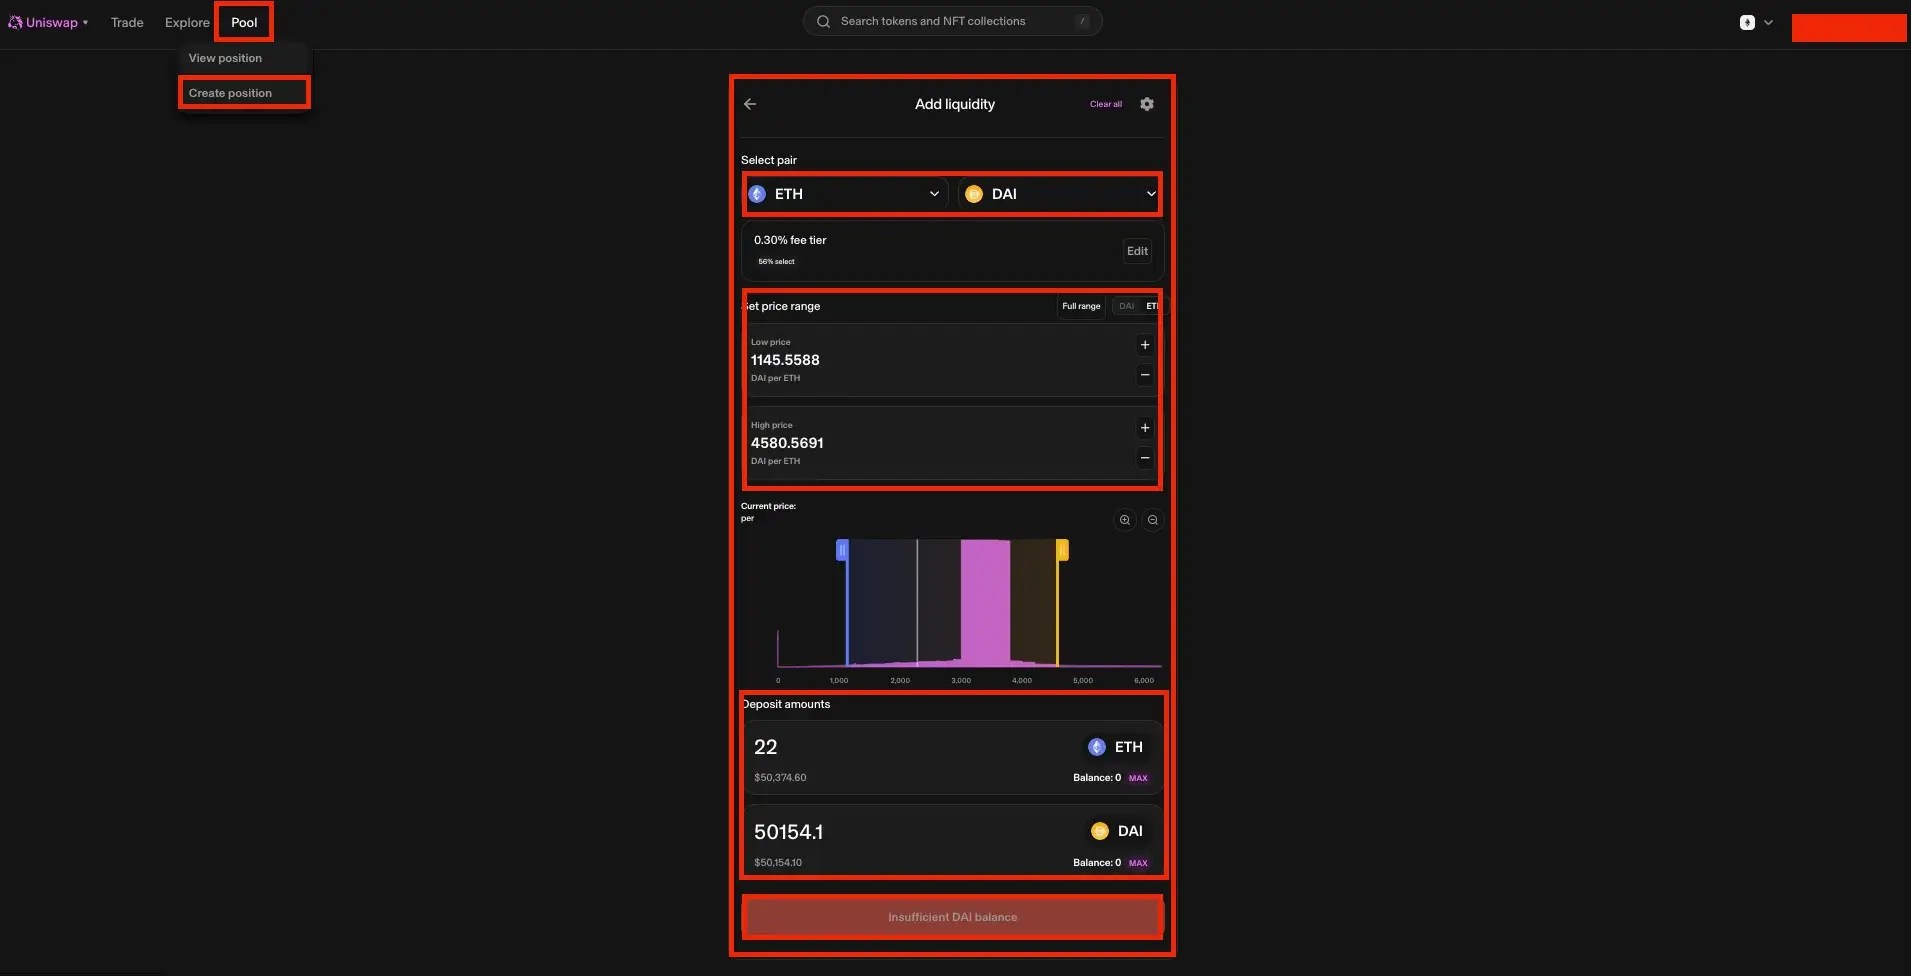
After choosing your token pair, select a fee tier. Uniswap offers four options: 0.01%, 0.05%, 0.3%, and 1%. The fee tier affects how much you’ll earn in trading fees. If a pool already exists for your selected fee tier, your liquidity position will join it; if not, you’ll create a new pool.
Next, set the price range where your liquidity will be active. If the price moves outside your set range, your liquidity will be concentrated into one of the assets and stop earning fees. You can set a specific range or provide liquidity across the full price range.
Step 3. Add Tokens and Confirm Transaction
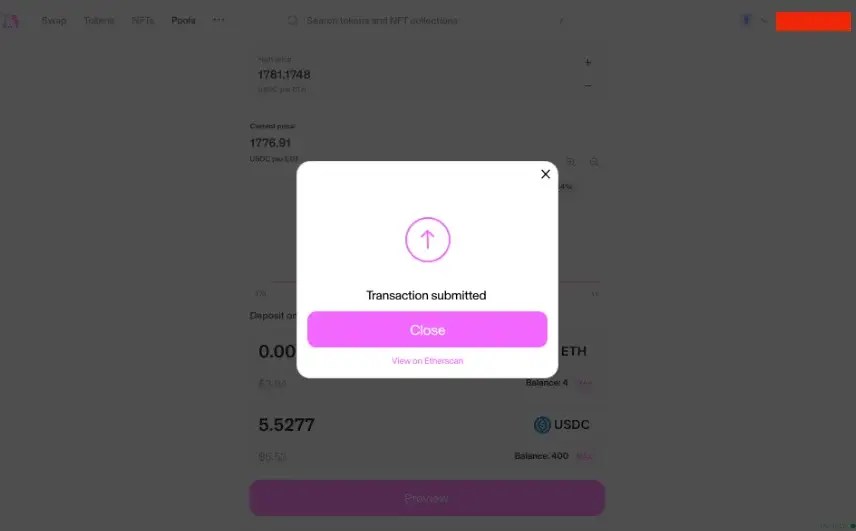
Enter the amount of tokens you wish to add to the pool or select “Max” to deposit the maximum amount.
Once done, click “Approve” and grant Uniswap permission in your wallet to use these tokens, which will involve network fees. After approval, select “Preview” to review the details and then “Add” to confirm the transaction. This will require a final confirmation in your wallet, and the transaction will incur another network cost.
Once completed, you’ll receive a confirmation and can track the status on Etherscan. Your liquidity position will then be live and manageable from the V3 Pool page.
FAQs
How is Uniswap Used?
Generally, Uniswap is used to provide liquidity, swap, send, and buy ERC-20 tokens in a decentralized manner. Users can also trade NFTs and participate in governance through the platform’s native UNI token. It’s widely known for allowing users to trade crypto without intermediaries, making it a go-to platform for decentralized finance activities.
How Do You Use Uniswap Swap?
Swapping tokens on Uniswap is quick and easy. First, connect your wallet and go to the “Swap” section. Select the token you want to sell, enter the amount, and choose the token you want in exchange. After that, click “Swap” and review the details. Approve the transaction in your wallet, confirm the swap, and pay any necessary network fees. Once done, your transaction will be completed on the blockchain.
Do I Need ETH to Use Uniswap?
While ETH is the native cryptocurrency of the Ethereum blockchain, you don’t necessarily need to hold ETH to use Uniswap. Uniswap supports a wide range of ERC-20 tokens, so you can swap other tokens for ETH or directly for other ERC-20 tokens.
However, you will need to pay gas fees in ETH to interact with the Ethereum blockchain, including using Uniswap. Gas fees are transaction fees that cover the computational resources used by the network. The exact amount of ETH required for gas fees can vary depending on network congestion and the complexity of the transaction.
What are Some Popular Decentralized Exchanges Besides Uniswap?
There are several other popular DEXs besides Uniswap, each with its own unique features and benefits. Some of the most well-known alternatives include PancakeSwap, SushiSwap, 1inch Network, Curve Finance, and Kyber Network.
Conclusion
Uniswap offers a powerful and user-friendly platform for trading cryptocurrencies through its decentralized exchange model. Whether you’re swapping tokens, sending crypto, or exploring NFTs, understanding how to navigate Uniswap will enhance your trading experience.
With the basics covered, you’re now ready to dive into decentralized finance confidently.
* The information in this article and the links provided are for general information purposes only
and should not constitute any financial or investment advice. We advise you to do your own research
or consult a professional before making financial decisions. Please acknowledge that we are not
responsible for any loss caused by any information present on this website.
Source: https://coindoo.com/how-to-use-uniswap/